Category Archives: DIY

Mav2Duplex

I just published updated project on GitHub


It is Arduino based converter for processing Mavlink telemetry data and send them in Duplex format (Ex but also old text one) into your receiver (and down to earth)


Features :

- sending data over Ex protocol

- sending data as text to even old Jetiboxes (include messages)

- Alarms


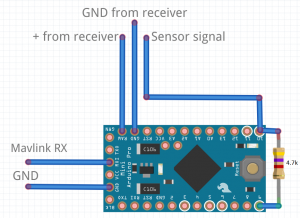
Here is wiring, it is really simple : Mav2DuplexWiring   Code using one hardware serial for reading telemetry from Mavlink board (ArduCopter or MegaPirateNG) and output data into Jeti as software serial.   Here is video to show Alarms https://www.youtube.com/watch?v=bKOuzuYNKlU

BTTerminal Pro – Released!

I am happy to announce that BTTerminal Pro version is released. Version is paid with trial. Trial limitations will be based on usage – you can send or receive about 20 lines of data each day with full BTTerminalPro features without any limits. Crossing limit will start changing text you receiving or sending into trial warning.

Installation can be find here

So, as long as you are not using Pro version on pro level (few commands in day), you can use it freely without paid. Also I believe that this will allow you to test all new Pro features before you decide to pay for them.

Here is first short list of new features and few new screenshots. This page will be changed in some type of manual for new settings as they are much extensive against free version.

New features :

- device level settings – you can have different settings for each device (include different keyboard or initial command which is sent to device after connection)

- device pin to start – then you can easily connect to your device from start screen

- Keyboards – standard keyboard is available along with robotic 3×3 keyboard. On this keyboard you can select button caption and also button command (can be longer than one character) and also button behavior – repeating buttons sending their commands as you touching them (you can slide over keyboard to drive robot) or can be in Click mode for one time send (good for Fire like commands :-) ). Also combination of 3×3 and line is available

- Escape text – you can use standard “C” escapes like \n and also \xFF to send binary values which are not possible to type on keyboard. Escaping also work in opposite way to display hex values received over BT

- Different color for received and sent text to better display orientation

- couple of bug fixes and improvements which will be included also in free BTTerminal soon


Datalog with MegaPirateNG 3.0.1 R4

As new MPNG 3.0.1 R4 have completely overhauled structure there is needed also do code changes in different way. Here is how to make it work. Sample uses pin 33 (Arduino notation) which is PortC , Pin 4 in ATMega notation.

What you need to update :

Lib\AP_HAL_MPNG\SPIDevice_SPI0.cpp

#define SPI0_MISO_PIN MISO
#define SPI0_MOSI_PIN MOSI
#define SPI0_SCK_PIN SCK
#define SPI0_SS_PIN SS  //add this

AVRSemaphore AVRSPI0DeviceDriver::_semaphore;

static volatile bool spi0_transferflag = false;

void AVRSPI0DeviceDriver::init() {
hal.gpio->pinMode(SPI0_MISO_PIN, GPIO_INPUT);
hal.gpio->pinMode(SPI0_MOSI_PIN, GPIO_OUTPUT);
hal.gpio->pinMode(SPI0_SCK_PIN, GPIO_OUTPUT);
hal.gpio->pinMode(SPI0_SS_PIN, GPIO_OUTPUT); //and add this

_cs_pin->mode(GPIO_OUTPUT);
_cs_pin->write(1);

Default SS pin have to be defined, set on output even if you are using different pin for slave CS. Reason is simple – if SS is not on output, SPI in AtMega resetting Master mode during operation and communication doesn’t work.

libraries\AP_HAL_MPNG\SPIDeviceManager_MPNG.cpp

/* dataflow cs is on arduino pin 53, PORTB0 */
AVRDigitalSource* df_cs = new AVRDigitalSource(_BV(4), PC);  //change this
/* dataflash: divide clock by 2 to 8Mhz, set SPI_MODE_3

Pin have to be changed. Use “PC”/”PB” convention instead of “PORTC”. Maybe there is not difference but PORTC doesn’t worked for me.

If anybody can confirm it to me, it will be great :-) After couple of tests I am little bit out and not sure if I covered everything.

BT Terminal Pro – development in progress

I started work on Pro version of BTTerminal. This version will be paid with similar price tag as cheap Arduino Pro Mini clone :-D

What are planned features :

- sending non ascii characters into device with simple escapes like \r \n and also full \xFF escape characters

- devices can be pinned to desktop so you can connect to device with one touch on Tile

- saved devices will have capability to send initial pack of characters to device (like two times CRLF to switch into command line mode and so)

- robot control keyboard – instead of standard keyboard can be robo keyboard activated. 3×3 buttons keyboard will be displayed with capability to remap codes sent by terminal to robot. Also you can say which button is visible or not. Feature can be used to drive robot with arrow buttons and fire Nerf mounted weapon with middle button :-) Or just send another 9 codes into device with fast access and without typing codes.

- Universal App version will be available soon – will run on WP 8.1. and Win8.1 (pay once, run on both) with additional features delivered with new SDK, including Cortana integration so you will be able start your communication with voice command. This version will be released after WP8.0 Pro version.

Original version of BT Terminal stays free and without 3rd party ads. I will put there only small, not disturbing ad to BT Terminal Pro.


Let me know what do you think or what do you want to add into app.


Datalog memory for AIO boards (or any Arduino board with ISP)

Following board can be used for any board with working SPI on ISP connector but is primary targeted for copters.

Biggest difference between Crius AIOP v.1 and v.2 is 16Mb dataflash on board. ArduCopter have same capability but Crius v.1 or Hobby King clone AIO clone don’t.

Dataflash logs can be really useful during tuning of your copter so I decide to extend standard boards with this new capability.

Result is small PCB board with LE33 voltage regulator (and two capacitors) to provide 3.3V VCC voltage for memory and Atmel AT45DB161D memory with 2MB (or 16Mb) capacity. Memory is SPI so we can create board as attachment to ISP connector on AIO board.

There is also one more wire needed for CS – I used pin 33 (originally used for camera trigger from RC receiver, not used in most cases) which is connected by wire with board.

How it looks can be seen here :
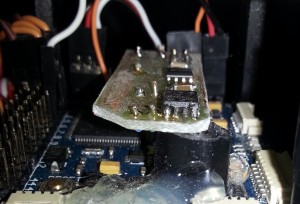
Result attached to Multiwii Pro with Mega 2560 XCopter board

Result attached to Multiwii Pro with Mega 2560 XCopter board

It is my first SMD so sorry for quality. Fortunately, SOIC 8 and 1206 sized parts can be soldered at home with reasonable soldering stuff without major problem. Also DPS can be done by photo etching easily (see other blog post for detail).

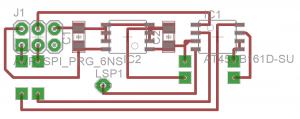
So here is schematic, board and pdf for your DPS :
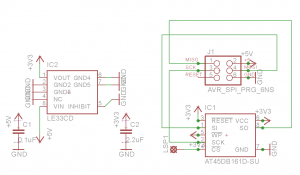
ISP Memory Schematic
ISP Memory Schematic

Board

Board

ISP Memory DSP

Also you need short update in your MegaPirate NG code (for arduino look for standard DataFlash library)

1. locate Dataflash folder in Libraries

2. change pins settings in DataFlash_CRIUS_AIOP2.cpp  code

// arduino mega SPI pins
#define DF_DATAOUT MOSI // MOSI
#define DF_DATAIN MISO // MISO
#define DF_SPICLOCK SCK // SCK
#define DF_SLAVESELECT 33 // SS (PB0)
#define DF_RESET 32 // RESET (PG0)

where DF_SLAVESELECT is your chosen pin on board. DF_RESET should lead to unused pin although is not used for board.

3. set your config to Crius V2

#define PIRATES_SENSOR_BOARD PIRATES_CRIUS_AIO_PRO_V2


Compile code, put your board on your copter and done.

Now you have dataflash logs capabilities and you can measure your vibrations or other stuff on copter.
 

Easy way how to create PCB at home

Couple of points how to create PCB at home. I am not talking about double sided PCB’s for Arduino or other big stuff. It is better to order them already ready from China or SparkFun. But sometimes you need small board for some additional stuff.

So how to do it easily :

1. Let’s use SMD – 1206 sized and SOIC chips are fully ok for home use and soldering

2. Install CAD Soft Eagle – free version is enough for target boards

3. Prepare board in Eagle – if you need cross lines (one side PCB), you can use wire or you can use 0R as bridge and you can have it wire less :-)

4. Print it on normal paper with your standard InkJet printer, mirrored and with max available DPI

5. Use PCB with some positive layer – in Europe is available “Positiv 20″ spray which will put positive layer on pure board , in size which you want

6. Make paper transparent – I am using mighty WD-40 oil. Just spray it, take down exceeding oil and paper is transparent enough

5. Put paper with inkjet down to board and let UV light work on it. UV light can be tricky – it is not to easy get but you don’t need special UV light. For example – lot of halogen lights or cheap desktop lamps with G23 bulbs produce enough UV light to work with PCB with distance like 5 cm /2″ and for 5 minutes or so (test your own to get proper timing). I am using cheap IKEA lamp for light over table. I just put it closer to PCB if I want to develop PCB. Perfect 2in1 solution :-D

6. Follow manual for your positive spray to make it finished (7% of sodium hydroxide)

7. Make PCB etched with FeCl (slower but safer than other more aggressive etching agents)


On the end , you will get really nice PCB developed at home, without special stuff like laser printer, transfer foils or UV light.